Fixed Scroll Gaging Station
Gaging Parameters
GAGING SYSTEM: Electronic (LVDT)
OPERATION: Manual
NUMBER OF CHECKS: 3
READOUT: CAGTM
CLASSIFICATION: Good/Reject
FEATURES: Closed-loop feedback to machine tools. CAG compares data on critical features of audited samples of workpieces. Detects trend toward out-of-tolerance measurements. Directs machine tool to make tool offset corrections. Flexible to accommodate family of three parts.


The Challenge
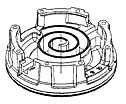
An air conditioning manufacturer produced its fixed sections of scroll compressors on modern CNC machine tools. The machines were performing well, but it was difficult to calculate tool wear. Worn tools continuing to cut parts made scrap. Out-of-tolerance conditions were gradual and unpredictable. Checking each workpiece would be extremely time consuming, and periodic gaging by the operator simply didn't work. Only after bad parts were detected coming off the line could tool offsets and corrections be made. Now the manufacturer had to contend with reject parts and downtime.
Further complicating matters, there were two different sizes in the part family, with a third joining in the near future. Sometimes three machines produced the same size part. At other times they produced the different sizes simultaneously, depending on order needs. The quality control resolution would have to be flexible, as well as accurate.
The Solution
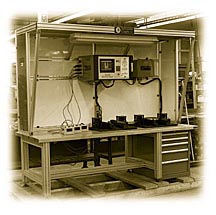
Edmunds Gages designed and built a manual gage featuring advanced measurement technology. Our CAGTM (Computer Aided Gage) microprocessor readout analyzes those measurements, detects tool wear trends, and directs the CNC machine to make the cutter offsets. All automatically. Because the tool wear is gradual, only a sampling of parts needs to be checked periodically. This is known as an "audited" inspection, as opposed to a 100% inspection. The need for flexibility was also addressed in both hardware and software. Here's how it works:
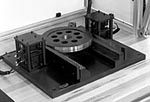
We took our gaging bench, which is a convenient and practical workstation for manual gaging operations. We then mounted two gaging fixtures to accommodate both of the current workpiece sizes. There is space allowance for another fixture when the third size comes on line. Each fixture consists of two hardened and ground rails, edge guides, a vee-block, two electronic LVDT probes mounted within reed contact units, and a push-button box. One CAG computer receives data from the fixtures.
In use, the operator first prompts the CAG to which machine tool is producing which part size. This is accomplished easily and quickly by pre-programmed commands. When the process dictates it is time to gage a part, the operator slides the workpiece onto the rails of the fixture, aided by the edge guides. The rails are serrated to remove oil and debris from the workpiece, ensuring solid contact for accurate gaging.
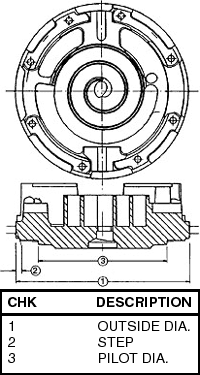
Once the part rests in the vee-block, the operator depresses the start button and the gaging probes send the data to the CAG for analysis. Three dimensions of the workpiece are measured statically and simultaneously – the primary outside diameter, the seal ring offset step, and the bottom pilot diameter. The CAG is programmed to identify tool wear trends based on the data received from the gaging probes. When necessary, the CAG directs the machine control to automatically make tool offsets, compensating for wear, and maintaining part tolerances. It is a true, closed-loop feedback system.
Because this is an audited process accomplished manually, the customer uses labor more productively and does not have to invest in excessive automation equipment. And the gage's flexibility to accommodate up to three different sized parts is a major benefit contributing to increased accuracy, reduced downtime, and the economy of three gages in one.
Do you have a measurement challenge that could be solved by a custom gaging solution? Perhaps we can help. There is no charge for an explorative discussion. Contact the Sales Engineering Department at Edmunds Gages.
The Result
Our customer is experiencing several benefits with the fixed scroll compressor gaging station. The overall advantage is improved part quality achieved in a cost effective way. The CAG makes the decision about tool wear trends, which is always consistent, eliminating operator subjectivity. It also frees the operator to perform other tasks. He or she doesn't even have to adjust the machine control to modify the tool offsets. It is all done automatically, CAG to machine control.


A New Dimension In Precision Measurement
.
(860) 677-2813
Toll Free 877-521-5818