Orbiting Scroll Gaging Station
Gaging Parameters
GAGING SYSTEM: Air and Electronic (LVDT)
OPERATION: Manual
NUMBER OF CHECKS: 5
READOUT: CAGTM
CLASSIFICATION: Automatic
FEATURES: CAG compares data on critical features of audited samples, detects trend toward out-of-tolerance, and directs machine tool cutter corrections
The Challenge
A manufacturer of air conditioning units had a common problem: Tool wear was the chief cause of variation in the CNC machining of the orbiting sections of its scroll compressors. Since those variations occurred very gradually, manual gaging at random intervals of each workpiece would be unnecessarily time consuming. It was difficult to determine proactive machine corrections from even periodic gaging. Corrections could only be made after bad parts began coming off the line.
Adding to the complexity of the problem, there were two different sizes of orbiting scrolls, with a third member of the part family to arrive soon for a new unit. Depending on the order, the three machine tools dedicated to these parts might simultaneously produce the same or different scroll sizes. The measurement solution would not only need to be accurate; it also had to accommodate the three sizes.
The Solution
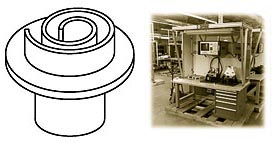
Edmunds Gages custom designed, engineered, and built a computerized gage that communicates to the three machine tools when to make cutter offsets. The measuring system consists of a durable and convenient gaging bench, manual fixtures for each part size that feature a combination of air plugs and electronic LVDTs which send data to the computer's brain, the Edmunds CAG microprocessor.
In operation, the gage works like this: Using pre-programmed commands, the operator "tells" the CAG which machine tool is machining which particular part size. Since tool wear is gradual, and compensation is statistically based, an audited inspection suffices. The CAG alerts the operator when it is time to check a part. The operator places the part in the appropriate fixture for measuring. The part sits on an anvil, and a pivoting plate, which incorporates some of the gage heads, is pulled down on top of the part. It is very important that the plate position is highly repeatable for consistent, accurate readings. To establish the plane, we used a three ball setup. These three balls either mate or sit securely with mechanisms in the lower part of the fixture for the exact same position each and every time.
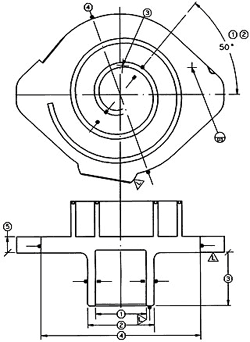
Five features of the orbiting scroll are checked: the bearing ID with a two-point air plug; two ODs with a pair of LVDT probes in reed units; the height with a single LVDT; and the start machining height which is the average of three LVDT probes.
Once the part is placed in the fixture, and the plate is swung down on top of the part, the operator simply presses the "Start Gage" button corresponding with the relative machine tool. The gage heads signal information to the CAG. The CAG continuously analyzes the data, and when it detects a trend toward an out-of-tolerance condition, it alerts the machine to compensate for tool wear. Over time, the process determines how many parts per hour need to be measured. The result: This measurement system meets the gaging challenge faced by our customer, and it is cost effective. Whenever parts can be audited, as opposed to inspected 100%, significant cost savings are realized. The gage did not require complex automation, and auditing minimizes labor involvement as well. Until the operator needs to pull a part, he can be working productively at another station. His attention can be on the task at hand, knowing that the CAG is number crunching to detect a trend toward tool wear. The operator does not have to guess and try to make that determination and then adjust the machine for offsets. It is all done automatically. Both scrap parts and down-time are slashed. Plus the gage measures two part sizes, with plenty of room on the bench for the third fixture when the new part is in production.
If you have a measurement challenge, it might be solved with a unique gaging system from Edmunds Gages. Let's find out. It costs nothing to explore the issue. Call our Sales Engineering Department today.
CHK DESCRIPTION
1 BEARING DIAMETER
2 HUB DIAMETER
3 HUB LENGTH
4 BASE DIAMETER
5 THICKNESS


A New Dimension In Precision Measurement
.
(860) 677-2813
Toll Free 877-521-5818