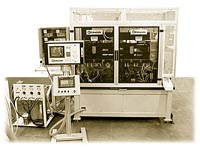
Automatic Piston Gage
Gaging Parameters
GAGING SYSTEM: Electronic and Air
OPERATION: Automatic
NUMBER OF CHECKS: 12
READOUT: CAGTM
CLASSIFICATION: Size
FEATURES: Automatic measuring, crack detection, roller burnishing, part washing and drying, marking, and sorting.
The Challenge
An automotive manufacturer's system of manually gaging its range of pistons during final inspection was slow, cumbersome, and did not provide 100% quality control. The company wanted an efficient method to measure each piston after machining, sort the good parts from the bad, and gather data that would provide information to improve their process.
The Solution
Edmunds Gages developed a multi-station automatic gage placed in the manufacturing area. Basically, here's how it works: Once a piston's entire OD profile and pin bore are machined, it is transferred to a staging area where it is picked up and cycled through the gage. The first station is a chip removal device, consisting of a slide with three steel hooked fingers. As the part rotates, chips are cleaned away from the ring grooves.
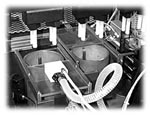
The next stations incorporate a part rinsing and drying system. At the rinsing station, coolant is removed from the piston in a tank with nozzles located on the ID and OD of the part. A remote pump applies pressure through the nozzles. A retractable cover is on the tank to prevent splashing of the rinse. The drying station is similarly designed, but with compressed air pushing through the nozzles. Further, vacuum devices attract the water droplets out of the air that were blown off the part.
The subsequent operation conducts an eddy current crack detection test while the part rotates 360º. If no cracks .005 inch or larger are detected on the head and at several land diameters, the part moves on to a pin bore orientation area. A laser determines by reflection whether the part is aligned properly or not by the pin bore location. If not, the programmable logic controller interprets that the part is 180º off, and directs the part to be rotated into the correct position for gaging.
The part is then conveyed to a roller burnishing station to impart a smooth surface finish. From there, the part is presented to a gage nest where three ODs are measured along with the concentricity of the skirt diameter to the oil ring groove. The measurements are accomplished via LVDT heads with pneumatic retraction for part loading. The pin bore is then air gaged in four places to check variances in taper and roundness at both ends. Compression height and pin bore offset measurements are also taken.
All of the measurement data is fed into the CAG microprocessor for acceptance or rejection. The part is then sent to a scale for weighing, and passed on to a dot peen marking station. Then it travels to the sorter where the piston is categorized as "good" or "reject" on the basis of part status as determined by the CAG. Good parts exit from the gage; reject parts are transferred to a reject chute.
The Result
With the automatic piston gage, the company is getting 100% of its parts measured and sorted to ensure no reject parts are shipped. Statistical information from the CAG microprocessor is analyzed to make adjustments in the machining process, reducing the total number of reject parts produced.
Operations Performed
- Chip removal from ring grooves
- Wash
- Dry
- Roller burnish pin bore I.D.
- Measure:
Skirt diameter
Skirt profile @ 2 places
Concentricity or ring groove to skirt
Pin bore diameter @ 4 places
Pin bore taper
Pin bore roundness
Pin bore offset
- Compression height
- Categorize by size
- Detect cracks
- Weigh
- Mark


A New Dimension In Precision Measurement
.
(860) 677-2813
Toll Free 877-521-5818