HARLEY-DAVIDSON REVS UP PERFORMANCE WITH 100% INSPECTION
(Milwaukee, Wisconsin) When Harley-Davidson Motor Company decided to roll out their newest line of high performance motorcycles, they did it in a big way. On the verge of the millennium, this was an opportunity to revamp not just a motorcycle engine, but the whole process of manufacturing it. And while they were at it, why not do it in a new location, too? The location is the former Briggs & Stratton warehouse (Briggs & Stratton still leases part of it from Harley-Davidson). This large, completely renovated space will house production for some 160,000 power trains per year, needed to meet demand for Harley-Davidson's current bikes, as well as their
Reprinted from Quality in Manufacturing
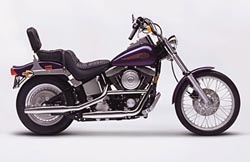
The new motorcycle series, utilizing the 1450 Twin Cam 88 (or Fathead, as it is fondly referred to), is not just a rework of an older style. It's a whole new concept, and the first from Harley-Davidson's state-of-the-art Product Development Center. The exterior of the engine may look similar to other models - a 45 degree, air cooled V-Twin, push-rod engine - but the internal components make the difference. Over 95% of the new engine's internal parts are different from the previous model. Among the most significant changes are larger cylinder bores and shorter piston strokes. What does this do for performance? A faster revving engine, sustained engine speeds of 5500 rpm, and longer engine life are the results.
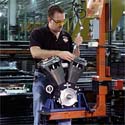
The 1450 Twin Cam 88 --- a whole new concept in motorcycle engines from Harley-Davidson's state-of-the-art product development center. Assembler Jeffrey Mish tightens bolts as the cylinders pass his station.
But that's not all that's new at Harley-Davidson. Brad Banachowicz, Quality Control Manager for the company, describes it this way: "We are instituting a new way of manufacturing - a new way of doing business, really - in Powertrain Operations. A Quality initiative, the 2003 Program for Powertrain Operations, puts the focus on meeting the customer's needs by proactively preventing non-conformance. This begins with our being process owner driven, focusing on the customer's expectations, providing ever improving performance levels, managing costs, and producing defect-free products and services. In the 2003 Program, and beyond, we will put prevention first. Instead of depending on inspectors or someone else down the line to catch the problems, we will start at the front of the line - be process owner driven. We are also partnering with suppliers and service providers who can actively help us."
He continues, " For instance, in 1996 when we took a look at our cost of quality, it resembled a triangle, with the smallest portion being prevention, and the largest being external non-conformance - the cost of defects found late in the process, and for warranty claims. Now we are turning this around. Prevention comes first, then appraisal - those costs incurred to determine the degree of conformance to quality requirements. Next comes internal non-conformance - scrap, rework, etc. The result is that the least cost will be incurred for external non-conformance, and we will have more satisfied customers."
To meet these goals, Harley-Davidson instituted new processes and procedures in several areas. In the cylinder department, this meant changing the tooling process, and completely re-thinking the inspection of parts. According to Banachowicz, the company started Best Practice Circles for just this purpose. "The Best Practice Circle is made up of Quality people who have experience and expertise in different areas of manufacturing at Harley-Davidson. In this case the Best Practice Circle decided that cylinder production and inspection needed to be more automated. This would make the process more efficient and cost effective, and would provide for 100% inspection of the cylinders." After the Best Practices Circle came up with recommendations, the quality engineer who was in charge of the new product design met with the people directly responsible for producing the product. Shift operators and inspectors became involved in the final plans for the process and procedures to make it work. And help was also enlisted from trusted equipment supplier partners.

100% inspection gaging system was built exclusively for automated inspection of Harley-Davidson cylinders by Edmunds Gages. A robot assists in automating production and inspection of the cylinders.
Dave Ryan, Senior Manufacturing Engineer at Harley-Davidson's Powertrain Operations, was one of the people involved in the new process for the 1450 Twin Cam 88. He describes the revamping of the cylinder department, "The cylinder department is made up of four cells which do the milling on the fins of the cylinder as well as the turning, facing and some of the chamfering operations. We also do the drilling of oil drainback holes and locator holes. The parts are palletized and ride from cell to cell, and then feed directly to the assembly line. The new automated processes use a robot to remove the parts from the pallet and move them to the machines." Automation increases efficiency and helps to reduce costs. Another big cost savings comes with 100% parts inspection. The robots move the cylinder parts to an automated gage, manufactured by Edmunds Gages in Farmington, CT, to be inspected. Ryan explains, "In the past, operators would check the parts with hand gages every so many parts. This was necessary because, in a high volume operation, over time the tooling machine parts would wear. This would cause them to produce engine parts that were not up to spec. That, in turn, generated scrap if it was not caught right away. It also meant production down time while the problem was located and resolved."
The robot in each cell picks up the cylinder and deposits it on the Edmunds autogage. The gage measures the overall height of the cylinder, the outside diameter of the "skirt" (the cylinder bottom edge), the deck height, the cast reference datum, and also the bottom fin. The fin measurement is critical for the fitting of the cylinders to form the "V". Close attention is also paid to the key points which determine that the cylinder will be ready for subsequent operations. The Edmunds gage is able to detect variances as small as .0010" on measurements such as the skirt OD."With the new Edmunds gages, every single part is inspected automatically. We wanted a machine that would inspect each cylinder's key features, and adjust the machinery to compensate for wear. The Edmunds gages do that, increasing our throughput and reducing downtime significantly."
The gage can detect measurement variances as small as .00001 inches, and can detect and compensate for tooling machine wear.
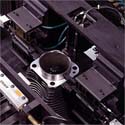
Adds Jack Gaughan of Edmunds Gages, "We built this cylinder gaging system exclusively for Harley-Davidson Motor Company to help them automate their inspection process, and maximize productivity. The gage system consists of a free standing gage base, machine control cabinet, PanelView controller and Edmunds MicroCAGTM readout. The main gage fixture consists of contacts mounted to the gage plate and a locating gage plug mounted to an air-actuated slide. In auto mode, the parts are presented to the gage plug by the robot. Once the part is in position, the contacts are advanced and the part is measured."
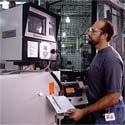
Dave Ryan, Senior Manufacturing Engineer, views SPC graphs, charts and histograms in while the inspection is in process.
New quality goals, new products, new processes and new partnerships ... Harley-Davidson Motor Company leads the pack as they roll into the new century.
Second Article: Harley-Davidson Meets Tight Tolerances...
Further, the Edmunds system keeps track of the measurement ranges from cylinders completing a particular operation. By computing a rolling average, the system can tell when there is wear on a particular machine. If it detects wear it can signal the machine to compensate accordingly. The Edmunds MicroCAGTM control system allows the operator to view data, accept/reject status, parts totals and SPC graphs, charts and histograms on the fly. It can be programmed to measure several dimensions simultaneously, for automatic or manual sorting, classification or machine tool feedback. Real time clock displays date, shift, time and gaging functions. Reports functions include parts counters, numerical data for each part and feature checked, and full SPC statistics. If a part is rejected after a tooling operation in one of the cells, the robot separates it from the process flow and sends a signal for the machine to shut down, idling the cell and preventing problems further down the line. Says Dave Ryan, "Without the automatic gage we would have had to add an auxiliary spur on the conveyance system, and someone would have to check parts manually. This would have slowed down the process, and since we wouldn't be able to do 100% inspection, we would have ended up with a higher scrap rate. I need to stress that what enabled us to be successful with the automation in these cells is the Edmunds automatic gage."


A New Dimension In Precision Measurement
.
(860) 677-2813
Toll Free 877-521-5818